Have a minute? In 60 seconds or even less you can practice Yoga and gain significant and lasting benefits. No need for a Yoga mat or special clothing. Despite the misconception that Yoga is a trendy form of exercise where you go to a class and twist yourself into a pretzel, this ancient discipline is actually a practice of awareness that can be done anytime, anywhere. And it’s accessible to virtually anyone, regardless of age or fitness level. If you can breathe, you can practice Yoga.
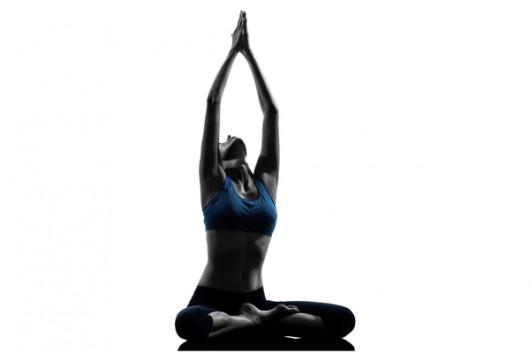
In fact, you can fit quick Yoga “micro-practices” into activities you’re already doing (such as sitting at your desk, standing in line or walking down the street) to help cultivate relaxation, joy and well-being. I call these Yoga Sparks, an idea that arose through my own practice, studying Yoga for more than 35 years, as well as my work with hundreds of Yoga students and Yoga therapy clients with whom I also practised jnana Yoga.
Frequently, people tell me they’re intrigued by Yoga or have even tried it, but were discouraged because it was too difficult or time consuming. Yoga Sparks offer an easy, practical way for people to step their toes into the Yoga waters. They’re so helpful that people are inspired to make time for a longer practice.
Similarly, many dedicated Yoga students who rarely miss a Yoga class confess that they never practice at home. They offer varied excuses: “no time,” “not sure what to do,” and “lack of discipline” are common ones. Yet many express eagerness for suggestions on how to expand their practice. Yoga Sparks are simple, effective tools to help deepen your Yoga practice and take the benefits off the mat and into daily life.
In my own experience, I’ve found that interweaving micro-practices into my day can be transformative, turning ordinary activities into sacred rituals and continually bringing awareness to the precious gifts of body and breath. I have compiled more than hundreds of them into a book, “Yoga Sparks: 108 Easy Practices for Stress Relief in a Minute or Less.”
Five Posture Yoga Sparks
These postures are designed to help you re-connect your mind and body, find proper physical alignment, and enhance your health.
1. Mountain Pose
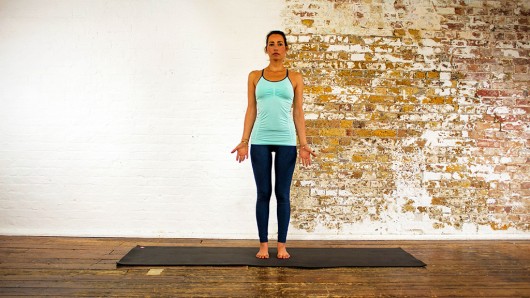
The most basic standing posture, Mountain Pose teaches us, literally, how to stand on our own two feet. Many common aches and pains, including back and neck pain, are often linked to poor posture. Practicing the healthy alignment of Mountain Pose can offer profound relief.
Take a minute to come into Mountain Pose anytime you’re standing—whether you’re waiting in line, cooking dinner, riding an elevator or chatting at a party. Here’s how to do it:
- Bring your feet hip-width apart and distribute your weight evenly on both legs.
- Feel the ground under your feet. From that place of rootedness, activate your leg muscles and lengthen up through your spine.
- Extend the top of your head toward the sky, being sure not to lift your chin—keep it parallel to the ground.
- Relax your shoulders down away from your ears and release any tension in your face and throat.
- Stack your joints, so that if someone were looking at you from the side, your ear would be over your shoulder, your shoulder would be over your hip, your hip would be over your knee and your knee would be over your ankle.
- Imagine a light at your breastbone and shine it forward.
- Take a few full, easy breaths, feeling as steady and grounded as a mountain.
2. Seated Mountain Pose With Shoulder Shrugs
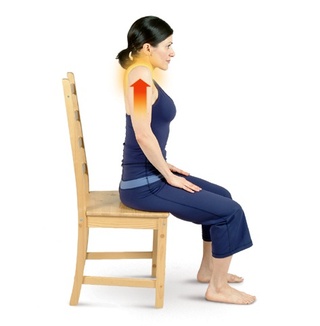
This posture teaches proper sitting alignment, which can help relieve back pain as well as enhance respiration and circulation.
- Sit tall in your chair so that you can feel your “sit bones” — the two hard knobs at the base of your pelvis — pressing down onto the chair seat.
- Rest your hands in your lap and your feet on the floor.
- Extend the top of your head up toward the sky. Keep your chin parallel to the floor; avoid tilting it up or tucking it in.
- Stack your joints so your ear is over your shoulder and your shoulder is over your hip.
- Imagine a light shining out from your breastbone (sternum) and direct it forward, not down at the ground.
- On an inhalation, lift your shoulders up toward your ears.
- As you exhale, drop your shoulders down. You can also say “ha” and think about expelling all tension as you do.
- Repeat three to five times, synchronizing your movement with your breath. Keep your arms as relaxed as possible.
3. Tree Pose
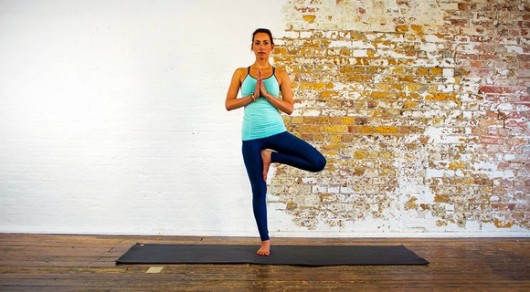
Balance poses teach some of Yoga’s most important lessons: getting grounded, finding your center, staying focused, maintaining concentration and steadying the mind.
The process of learning to balance with its inevitable falling and trying again cultivates patience and persistence, humility and good humor. These qualities help us do more than stay balanced in asana. They help us stay balanced in life. Practice Tree Pose near a wall or countertop you can touch lightly for support.
- Stand tall in Mountain Pose (#1).
- Find a fixed spot at eye level and focus your gaze there. This helps stabilize your balance.
- Imagine sending roots down into the ground through your right foot and pick up your left heel. Then bend your left knee and, keeping your toes and the ball of your foot on the ground for stability, slide the sole of your left foot against your right ankle.
- Bring your palms together at your chest or extend your arms up to the sky, keeping your shoulders relaxed and down.
- Balance here for a few breaths. To increase the challenge, lift your left foot off the ground and place the sole against the inside of your right leg anywhere but at the knee.
- Balance for several breaths, then repeat with the other leg.
4. Chair Pose
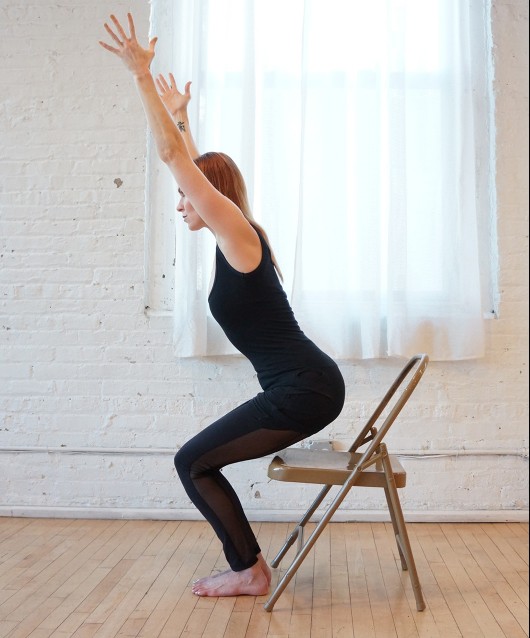
Practicing Chair Pose can enhance strength and balance.
- Sit toward the front of your chair with both feet on the floor.
- Take an easy, full breath in, then exhale as you lean slightly forward from your hips, keeping your back straight. Press your feet into the floor and use the strength of your legs to stand. Make sure not to round your back as you do this.
- Inhale as you extend your arms forward to shoulder height, bend your knees and lean slightly forward from your hips — not from your waist. At the same time, stick your bottom out and, without letting your back get round, lower yourself slowly back into the chair.
- Repeat five to 10 times, coming to a standing position, then slowly lowering yourself back to sitting. Be sure to keep the breath flowing; don’t hold your breath. For extra challenge “hover” with your bottom just above the seat.
5. Puppy Pose
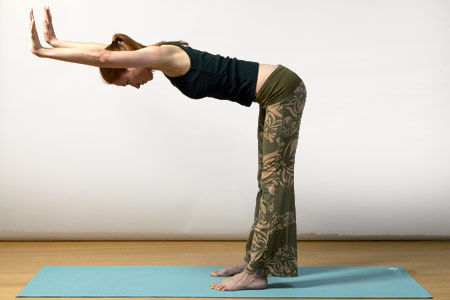
Many Yoga postures are named for animals, who have a great deal to teach us about living well in our bodies including the important lesson of stretching whenever we get up from a fixed position.
This pose is a variation of the classic Yoga posture, Downward-facing Dog, which is inspired by the canine’s “paws down, tail up” stretch. To practice:
- Rest your palms on a wall, counter top or shelf, shoulder-width apart.
- Walk your feet back and hinge forward from your hips until your arms are fully extended, your torso is parallel to the floor, and your hips are directly over your ankles.
- Inhale deeply, then exhale as you press your palms into the counter and draw your hips back, keeping your neck in line with your spine.
- Stay here for a few breaths.
Some people wonder what is best yoga mat to use for these poses? The best part is – many of these poses can be done with or without your mat.


